Helping out my babies! Longer 1 hour version on my patreon page! 🙂 ✨ Monthly tutorials on my Patreon: …
Order the best illustration at the best price for your business, your company, or to resell them on other sites that pay for the service at more expensive prices, earning the difference:
✔️Click Here to Quick and economical illustration.
this allows you to correct your mistakes like I mean look at that within the span of like 5 Seconds we’ve made the cart Titan God look at those lips all right that’s enough you stay right there do not move what you look good all right guys welcome back today we’re going to learn so get off your toilet stop eating your food put your homework away this is the most important lesson that you’re going to learn for the rest of your life I got notes all right we’re getting serious today so in today’s video I’m going to give you guys a quick overview on some of the key tips and tools that I cannot live without when it comes to digital art this is going to be a very beginner friendly video and anybody can learn this and get into this okay even you with your two whole brain cells it’s okay I fa the same struggle I’m dumb as first and foremost before I start any drawing I’m always looking for a reference and the absolute best place to find references is on Pinterest for those of you who might be living under a rock this is how it works okay so I’ve got a folder here of cloud images now if I were to click on one of these cloud images you get a bigger version of it but you also get all of these other related images this is as good as it gets for finding references and inspiration and if you have been using Google images for that bro seek help see like look at this are you kidding me oh my God save now once you found your reference the second thing that I get the most questions about aside from what brushes do you use God stop asking asking me the second thing I get the most questions about is what’s your canvas size how do you set up your canvas so here I’ll show you guys in procreate but this works in all other programs as well you want to click on this plus icon and then you want to click on that top right add icon okay and this is where you start a new canvas now for me I like a good amount of resolution but I also don’t want my painting to be so big that every time I blend something my computer just explodes so I set my width to 4320 and I set my height to 5400 and you always want to make sure that your DPI or Doss per inch is 300 the reason for that number is because if you ever want to print your art 300 is a place to be at now follow along with me here okay especially if you failed math that you need this when you export this canvas at 25% or 1/4 of the original size you’re going to get an image that’s 1080 by 1350 and that is the exact measurement of a vertical Instagram image I’ve done my math so that’s why this works for me you always want to think about the final output and where it’s going to go and if you come down here to color profile I usually usually just set it on srgb iec61966-2.1 now just before you actually start painting on this canvas you’ve got to set up your workspace for me the most important thing here is that when you go to your Color Picker set it to Classic I’ve seen quite a few people use the dis method when they’re drawing and I I don’t like this at all okay in fact it’s probably ruining your art few reasons why I love this classic Square okay you can see exactly where you are on the Hue slider okay beautiful you can see exactly where you are in terms of saturation you can set this to half saturation quarter saturation it’s very precise okay and you know exactly where you are on the value slider too I use this on Photoshop as well now that you’ve got your line art brush and you’ve started painting and by the way if you guys are interested in my brushes they’re on my patreon I want to show you guys my favorite way to get started okay you want to click on this icon right here okay this is the lasso icon this is available in basically all other drawing apps as well see what this allows you to do is you can draw an outline around your character and once you’ve closed it off you can drop a color in here and that becomes your base color and if you’ve seen my last tutorial you know that I like working from Big to small so I always start with a base color and then I start adding more colors on Top This lasso tool is very very useful for that it’s also great for adding anything that might have a straight edge okay let’s say there’s a reflection here and I want to just boom now there’s some reflection in the glass there’s multiple different types too you can also use it like this right you can draw organically with it or draw straight lines with it so now you fill that in boom she has a tumor easily one of the most useful tools when it comes to digital painting and here are a couple more things that I do for literally every single painting okay number one is Alpha lock when you Alpha lock a layer you can no longer paint on the transparent pixels of that layer so what does this translate to in English this layer is alpal lock so when I paint you see it doesn’t go outside what’s already on that layer let’s say I’m trying to paint a darker color on the hair I only have to worry about one silhouette on the inside instead of the silhouette on the outside it just saves me so much time and makes me want to pull my hair out a little bit less keeps me sane keeps me from going to the grocery store getting milk and never coming back again but see sometimes this is a little bit too destructive cuz you’re painting on the same layer this is where another very similar method comes into play okay so we’re going to start a new layer we’re going to click on this layer and we’re going to select clipping mask now when we apply clipping mask you’re going to see that whatever we paint on this clipping mask layer is not going to go outside of the layer underneath it but the moment you release that clipping mask I’m just going to unselect that now everything goes outside of the boundaries now pretty much does the same thing as Alpha lock but this way you’re not destroying the painting that’s underneath so for those of you guys who are a little bit more hesitant you’re a little bit more shy with your brush Strokes you know you’re very timid you’re just like you this is great for you and while we’re talking about layers I know this can be a very confusing topic for especially beginners and people who are used to drawing on flat sheets of paper when I look at any scene any reference photo I always try to imagine if I were the lens of that camera what’s going to be the farthest thing away from me that’s going to be the background okay what’s going to be the thing that’s kind of like middle of the way that’s going to be the midr and what’s the thing that’s closest to me that’s going to be the forground I like to break it down by those categories okay I’ll show you how that works so when I’m rendering I usually like to start from the very back now the very back of this piece is going to be a flat color it’s going to be some details on top of that background so you see some windows some shops maybe some motorcycles in the background and now I’m imagining this threedimensional space I’m trying to get closer and closer to the camera so the next layer is going to be the windshield in the back just in front of that windshield we’re going to get the seat and the car’s exterior just in front of that we’re going to get some details on the seats lining and that completes the background layers now we’re going to move on to our subject which is going to be in front of all of these layers so I know we’re working in two Dimensions but you really got to think in three dimensions when it comes to layers so just beneath the line art the character is going to be on her own separate layer I’m going to have another layer for the seat belt that’s in front of her and then I’m going to have more layers for the details that I want to add on top and the reason that these details are on separate layers is because I don’t want them to actually destroy the painting that I made underneath just in case I’m not actually happy with the details I can just take that layer away very easily now you can move on to the foreground which is the window in between the camera lens and the character and on this layer we’re going to have some Reflections things that are in front that are closest to the camera so this is how I like to categorize my layers that makes it really easy for me you know it’s all being organized by depth now I would never start a new layer on top of everything else and start adding details into the background on this new layer and then you might start a new layer and start adding details onto the face of the character and next thing you know you’ve lost track of all of your layers you don’t know where anything is anymore it’s really infuriating to see hypothetically if you were my child and I caught you doing that I might just whoop your ass let me just show you guys that structure in this painting and this also can give you an insight into my preferred workflow so we’re starting off with the main silhouette for the character and then on top of that you see we’re starting to add a layer of detail so now you’re getting the hair you’re getting some strands here and then on top of that you’re getting even more detail even more strands another layer on top see some jewelry things that are in front of the highlights right now another layer on top more clothing things that are in front closer to the camera lens and then on top of all of that a little bit more shiny stuff and last but not least you’ve got the multiply layer for the line art okay the line art layer I always like to keep at the front now rapid fire I want to give you guys a couple more tools that I cannot live without and that is the ey dropper tool okay so for example if I wanted to add a slightly brighter highlight to the face okay I would not want to go back here and try to find this skin color all over again that would be a pain in my you know I’d have to do a whole bunch of experimenting and it’s not going to look like what it did before so this is where the eyedropper tool comes in you use that eye dropper tool you select the color and then you can shift the Hue shift the value and the saturation and now you’ve got a slightly brighter version of the color that you were looking for so you can’t really do this when you’re doing traditional painting but this is what speeds up digital painting so much another great thing to have here in procreate is if you use the wrench icon click on reference now you’ve got reference images that you can refer back to directly right very good here’s another really good one and you probably see me do this in a lot of my videos and that is if you click on this wrench icon you want to click on flip horizontal that flips your canvas now why the heck do we want to flip our canvas well think about it you look in the mirror every day you think you look good then someone takes a picture of you and you see that picture and you’re like my God I am hideous why is that well because your brain gets used to looking at things that it’s been looking at for a long time when you’re drawing you can easily go blind to the mistakes that you might be making so always make sure to flip that canvas around and check for any mistakes see the moment you flip it is when things are going to jump out at you you’re going to be like oh my go oh why why did I do that now kind of related to that once you see your mistakes you can come here come down to liquefy and this allows you to correct your mistakes okay super powerful I always use the push method but you can also use other methods you can use pinch um you can also use expand right make things bigger but you know for me personally I love using the push method I feel like you can pinch and expand to your own free will like I mean look at that within the span of like 5 Seconds we’ve made the cart Titan God look at those lips so that was just a quick overview of some of the tools and methods that I absolutely cannot live without when it comes to digital painting if you’re a beginner hopefully you learned something new from this video and if you’re an intermediate artist hopefully you got some insight into a different way of working and if you guys want to see an even more detailed look on this topic I have an hourlong video on patreon for this and it goes into even more detail so if you guys want to support the work that I do so that I can keep bringing these tutorials to you guys feel free to check that out that’s it for today guys if you want to see more content like this please do subscribe to my channel like this video share it with your friends do whatever you got to do you know and uh yeah I’ll see you guys on the next video this is ridiculous guys can we talk about the irony of paper straws look at how limp it is it’s flaccid you’re telling me that this this is saving the turtles meanwhile this whole thing is plastic okay how much plastic is here why don’t you give me a paper cup instead God I’m so tired of these corporations just pretending like they’re doing the right thing you can you stop okay Master ug didn’t die for this let’s start a new movement guys we’ll call it kill the turtles
Order the best illustration at the best price for your business, your company, or to resell them on other sites that pay for the service at more expensive prices, earning the difference:
Quick and economical illustration – Click Here.

Entrada siguiente
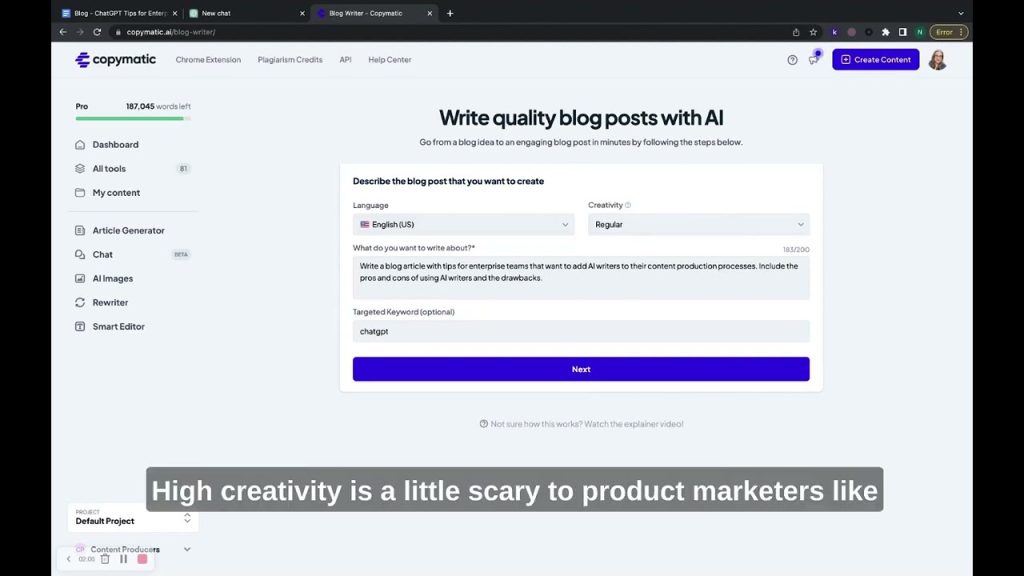
How to Draft a Blog Article with AI
Jue Sep 12 , 2024
In this video, Sr. Product Marketing Manager Nanette George demonstrates using an AI writing tool (Copymatic) to draft a blog … Ready to captivate your audience? Let me craft your next article or post! ✔️Here i show you a top rated social service: Click Here. ✔️And Here i show you […]